rfsoc4x2
A Vitis Extensible Platform with a single ADC for RFSoC4x2 (Vitis 2023.2.1 Unified IDE)
This is an attempt to migrate A Vitis Extensible Platform with a single ADC for RFSoC4x2 to the Vitis 2023.2 Unified IDE. Steps 0 to 2 are exactly the same as those before.
Step 0: Install the RFSoC4x2 board files
If not already installed, do the following steps to install the RFSoC board files:
- Get the board files from the RealDigital repo
git clone https://github.com/RealDigitalOrg/RFSoC4x2-BSP.git ~/workspace/RFSoC4x2-BSPThe board files are in
~/workspace/RFSoC4x2-BSP/board_files/rfsoc4x2. - Add the board files to Vivado:
Add the following line to Vivado startup script
~/.Xilinx/Vivado/Vivado_init.tcl(if the file doesn’t exist, add it):set_param board.repoPaths [list "<full path to home directory>/workspace/RFSoC4x2-BSP"]
Step 1: Create a Vivado Hardware Design
- Download the TCL script rfsoc_adc_hardware.tcl to
~/workspace. - Open Vivado and source the TCL script a TCL shell, or simply do
vivado -source rfsoc_adc_hardware_2023_2_1.tclto generate the following block design:
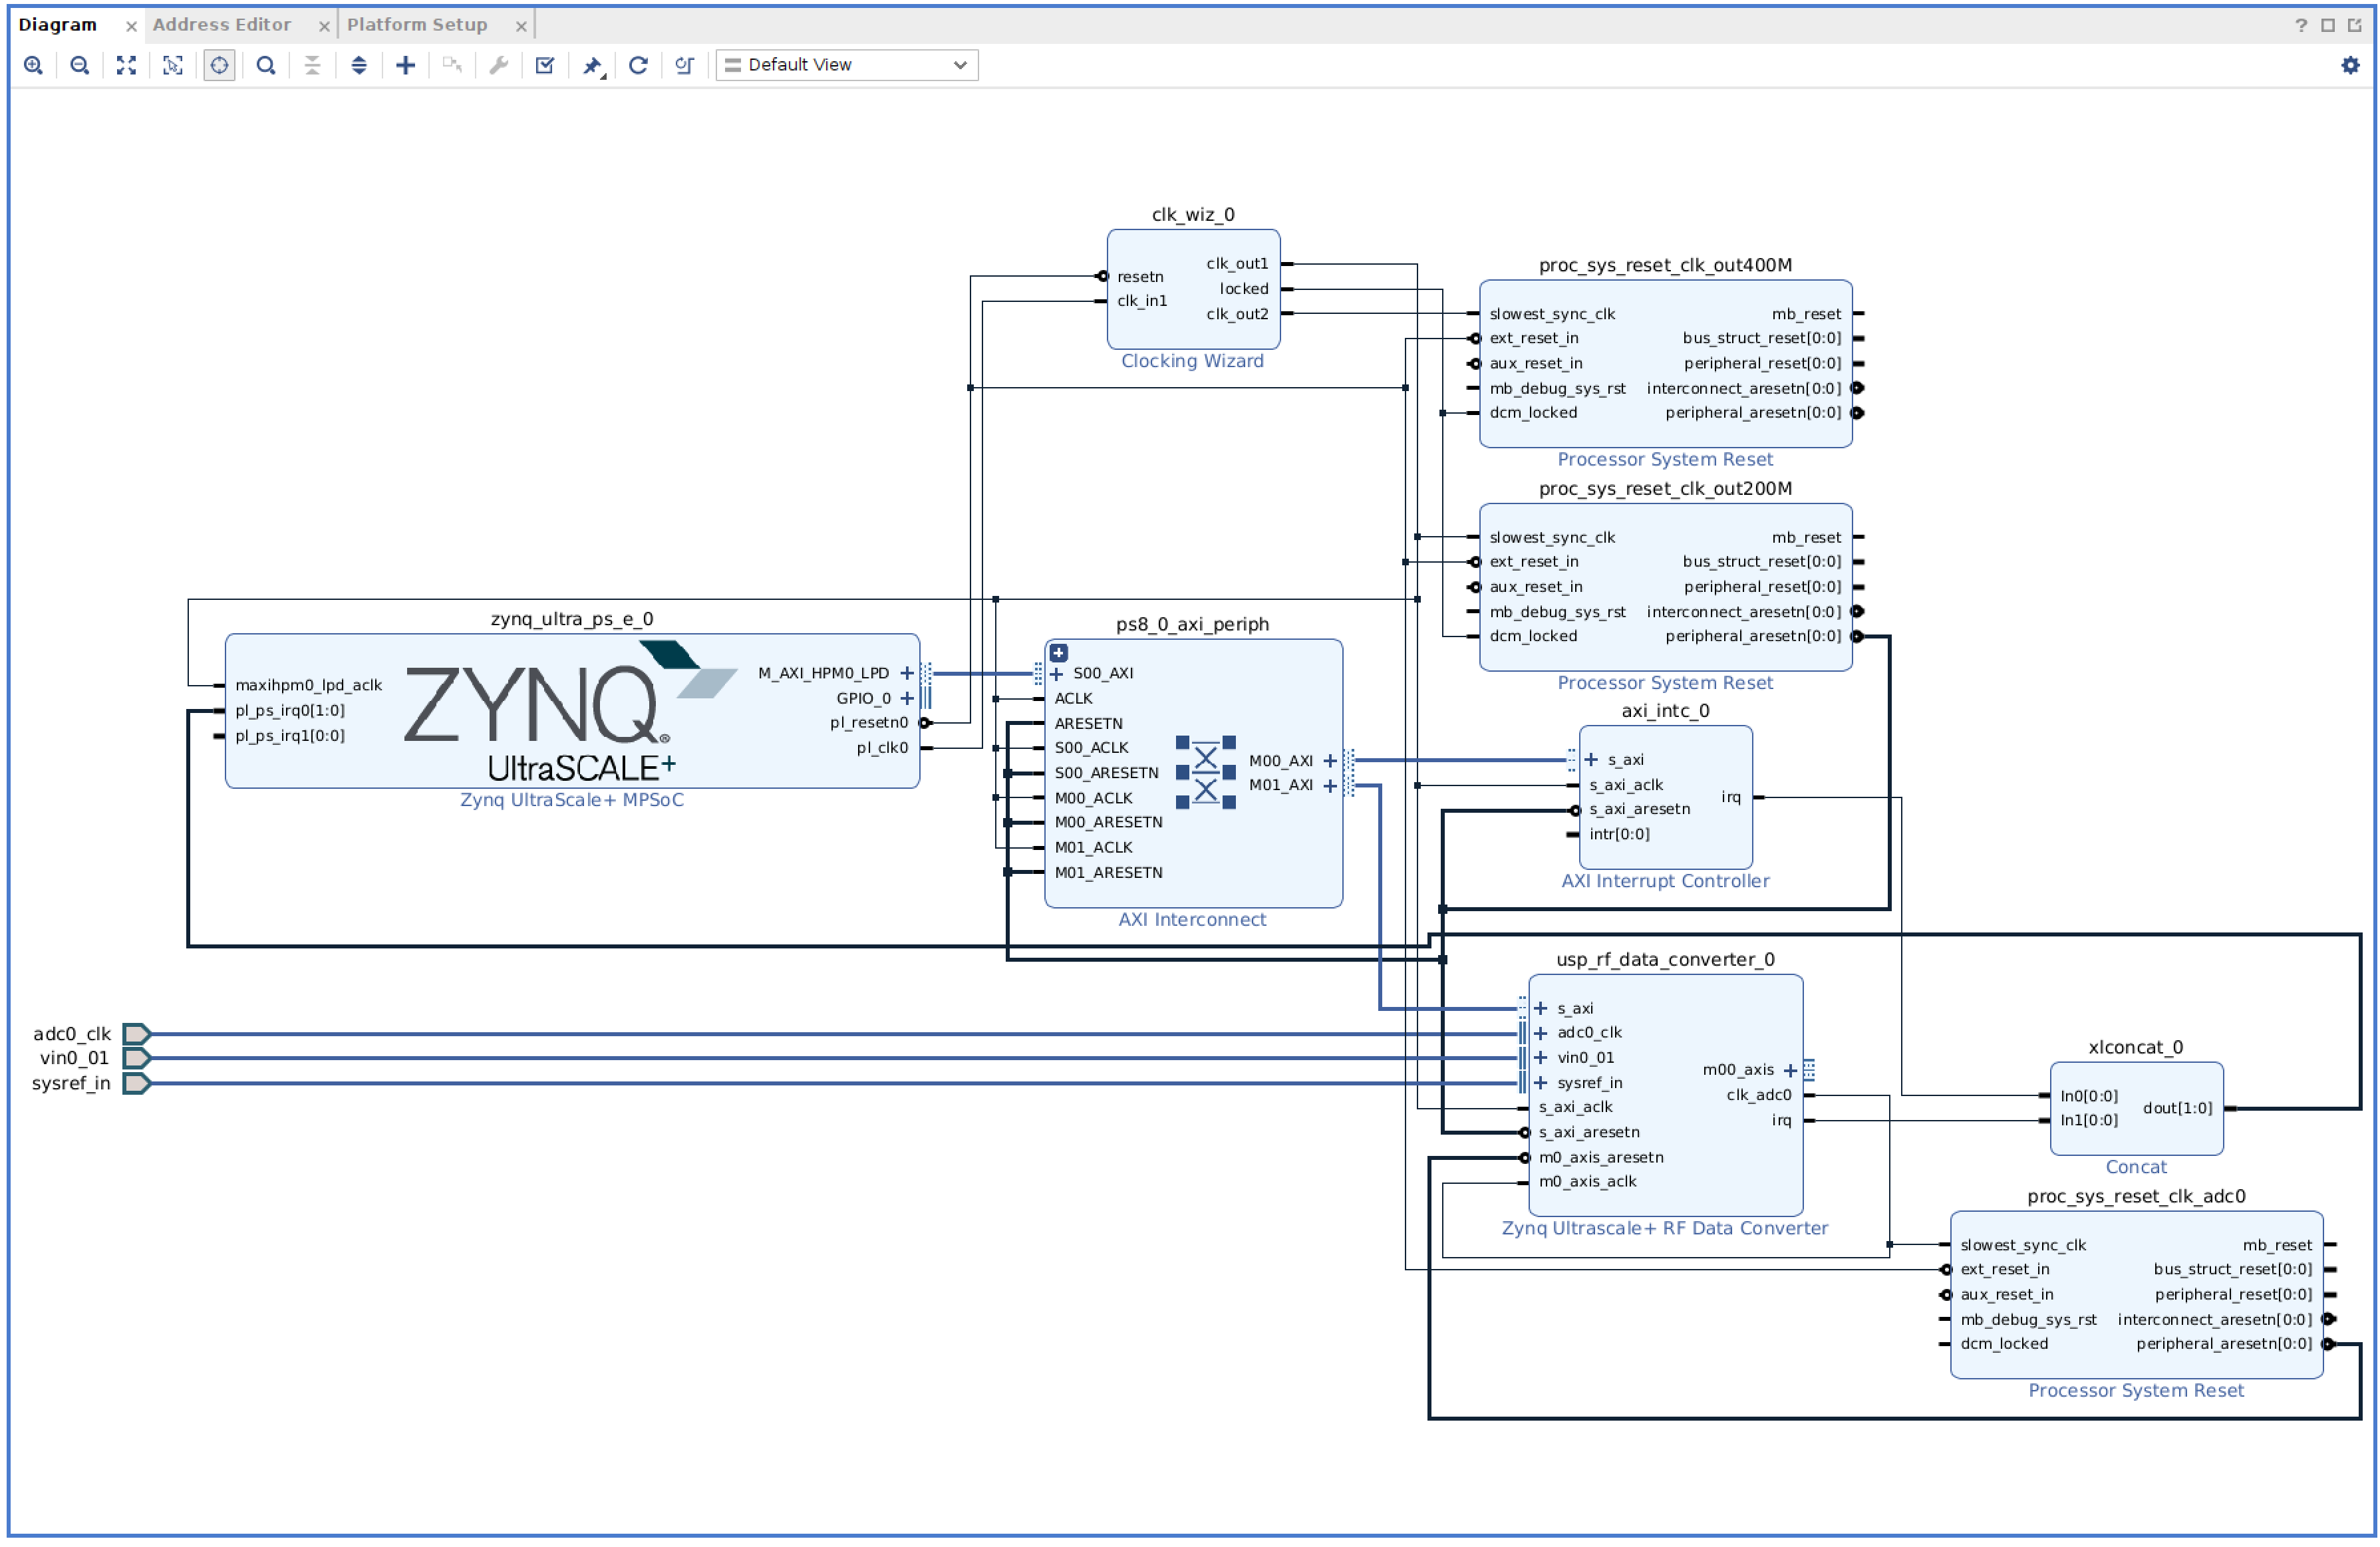 which adds an RF Data Converter IP to a slightly modified version of the hardware design in Vitis Platform Creation Tutorial for
ZCU104-Step 1.
which adds an RF Data Converter IP to a slightly modified version of the hardware design in Vitis Platform Creation Tutorial for
ZCU104-Step 1.- The Vivado project is named
rfsoc_adc_hardware. - ADC-D (ADC0 on tile 224) on the RFSoC4x2 board is enabled with sampling rate set to 2.4576 GSps.
- The Vivado project is named
- Export the platform
rfsoc_adc_hardware.xsafor hardware and platformrfsoc_adc_hardware_emu.xsafor hardware emulation.
Step 2: Use Petalinux to create boot files, device tree file, linux image, rootfs, and sysroot
- Create a Petalinux project:
cd ~/workspace petalinux-create -t project --template zynqMP -n rfsoc-linux cd rfsoc-linux - Enter the hardware plotform
rfsoc_adc_hardware.xsaand select EXT4 for rootfs:petalinux-config --get-hw-description=../rfsoc_adc_hardware/rfsoc_adc_hardware.xsa- Select Image Packaging Configuration->Root filesystem type->EXT4
- Exit and save configuration
- Add relevant libraries to rootfs:
- Add the following line to
~/workspace/rfsoc-linux/project-spec/meta-user/conf/user-rootfsconfig:CONFIG_rfdcto allow including the
rfdclibrary (we don’t use it in this experiment though) - Run
petalinux-config -c rootfs - Select user packages->rfdc
- Select
xrt:- Petalinux Package Groups->packagegroup-petalinux-vitis-acceleration-essential->packagegroup-petalinux-vitis-acceleration-essential
- Petalinux Package Groups->packagegroup-petalinux-vitis-acceleration-essential->packagegroup-petalinux-vitis-acceleration-essential-dev
- Select
libmetal(mostly forrfdc):- Petalinux Package Groups->packagegroup-petalinux-openamp->packagegroup-petalinux-openamp
- Petalinux Package Groups->packagegroup-petalinux-openamp->packagegroup-petalinux-openamp-dev
- Select Python (to run some PYNQ scripts later):
- Petalinux Package Groups->packagegroup-petalinux-python-modules->packagegroup-petalinux-python-modules
- Petalinux Package Groups->packagegroup-petalinux-python-modules->packagegroup-petalinux-python-modules-dev
- Select
opensshfor convenience:- Filesystem Packages->console->network->openssh->openssh, openssh-ssh, openssh-sshd, openssh-scp
- Select Image Features->package-management and Image Features->debug-tweaks
- Select any other packages as wish
- Exit and save
- Add the following line to
- Configure the Linux kernel:
petalinux-config -c kernel- Allow user-mode SPI device driver support:
- Select Device Drivers->SPI support->User mode SPI device driver support (select the * mark)
- Exit and save
- Allow user-mode SPI device driver support:
- Add device tree descriptions to enable access to the reference clock chips (LMK04828 and LMX2594) via SPI:
- Add the following lines to
~/workspace/rfsoc-linux/project-spec/meta-user/recipes-bsp/device-tree/files/system-user.dtsi:/include/ "system-conf.dtsi" / { chosen { bootargs = " earlycon console=ttyPS0,115200 clk_ignore_unused root=/dev/mmcblk0p2 rw"; stdout-path = "serial0:115200n8"; }; }; &sdhci0 { no-1-8-v; }; &spi0 { lmk@0 { compatible = "ti,lmk04828"; reg = <0x0>; spi-max-frequency = <500000>; num_bytes = <3>; }; lmxdac@1 { compatible = "ti,lmx2594"; reg = <0x1>; spi-max-frequency = <500000>; num_bytes = <3>; }; lmxadc@2 { compatible = "ti,lmx2594"; reg = <0x2>; spi-max-frequency = <500000>; num_bytes = <3>; }; }; &gem1 { status = "okay"; phy-handle = <&phy0>; phy-mode = "rgmii-id"; /* pinctrl-names = "default"; pinctrl-0 = <&pinctrl_gem1_default>; */ phy0: phy@f { reg = <0xf>; ti,rx-internal-delay = <0x8>; ti,tx-internal-delay = <0xa>; ti,fifo-depth = <0x1>; ti,dp83867-rxctrl-strap-quirk; }; };
- Add the following lines to
- Build the image and sysroot:
petalinux-build petalinux-build --sdk cd images/linux ./sdk.sh -d .- The boot files, device tree file, kernel image, and the EXT4 rootfs are generated in
~/workspace/rfsoc-linux/images/linux/. The sysroot is in~/workspace/rfsoc-linux/images/linux/sysroots/cortexa72-cortexa53-xilinx-linux.
- The boot files, device tree file, kernel image, and the EXT4 rootfs are generated in
Step 3: Create a Vitis Platform Component
Download the Python script create_rfsoc_adc_vitis_platform.py to ~/workspace and run
vitis -s create_rfsoc_adc_vitis_platform.py
to create and build the platform component rfsoc_adc_vitis_platform in ~/workspace. You can also run the python script line by line in the Vitis interactive mode (vitis -i).
Step 4: Test the Vitis Platform on the RFSoC4x2 board
- Start Vitis Unified IDE:
vitis -w ~/workspace - Create a new Vitis system project from template:
- Add Vitis example templates:
- Go to View->Examples or click the
Examplesbutton on the left widown edge to open the EXAMPLES view - Click the
Download(a downarrow pointing to a bar) button to install the templates from the Vitis Accel Examples Repository - Only need to do this once
- Go to View->Examples or click the
- Select Vitis Accel Examples Repository->Host Examples->Data Transfer (C) in the EXAMPLES view to open up the example.
- Click the
Create Application from Templatebutton to create a system project from the example template:- Name the project
test_adc. Press theNextbutton. - Select the
rfsoc_adc_vitis_platformcreated in Step 3. If the platform doesn’t show up as a choice, you can press the + button to add it. Press theNextbutton. - Enter
Embedded Component Paths:Kernel Image: Click theBrowsebutton to select~/workspace/rfsoc-linux/images/linux/Image.Root FS: Click theBrowsebutton to select~/workspace/rfsoc-linux/images/linux/rootfs.ext4.Sysroot: Click theBrowsebutton to select~/workspace/rfsoc-linux/images/linux/sysroots/cortexa72-cortexa53-xilinx-linux.- Check the
Update Workspace Perferencebox so that don’t need to enter the info again. - Press the
Nextand theFinishbuttons to generate the project.
- Name the project
- You show see the following three components added to the WORKSPACE view:
- test_adc [rfsoc_adc_vitis_platform]: System project
- test_adc_dummy_kernel [HLS]: HLS component
- test_adc_host [Application]: Application component
- Add Vitis example templates:
- Modify the HLS kernel and host source codes and build the project:
- Modify sources:
- Under the WORKSPACE view, replace the template file
dummy_kernel.cppin test_adc_dummy_kernel [HLS]->Sources with thisdummy_kernel.cpp. - Replace the template file
host.cppin test_adc_host [Application]->Sources->src with thishost.cpp.
- Under the WORKSPACE view, replace the template file
- Specify
v++linker connectivity:- Under the WORKSPACE view, open the configuration file
dummy_kernel-link.cfgin test_adc [rfsoc_adc_vitis_platform]->Sources->hw_link - Click the </> button to show the config source text and add the following lines to the file:
[clock]
id=2:dummy_kernel_1

[connectivity]
stream_connect = RFDC_AXIS:dummy_kernel_1.s_in
- Under the WORKSPACE view, open the configuration file
- Disable SD card image generation:
- Under the WORKSPACE view, open the configuration file
package.cfgin test_adc [rfsoc_adc_vitis_platform]->Sources->package - Check the box under Do not create image
- Under the WORKSPACE view, open the configuration file
- Build:
- Under the FLOW view, select
test_adcin Component - Click :hammer: HARDWARE->Build All to build the project
- Under the FLOW view, select
- Modify sources:
- Boot up the RFSoC board from an SD card:
- Insert the SD card into a card reader on the host machine running Vitis. Check its device name:
lsblk -r -OFor example, my SD card is
/dev/sdj. - Follow these steps to create a boot partition (FAT32) and a root partition (EXT4) on
/dev/sdj. - Write the rootfs to the root (EXT4) partition:
sudo dd if=~/workspace/rfsoc-linux/images/linux/rootfs.ext4 of=/dev/sdj2 bs=1M sudo resize2fs /dev/sdj2 - Mount the boot (FAT32) partition:
cd ~/workspace mkdir mnt sudo mount -t vfat /dev/sdj1 mnt - Copy boot files, bit file, and executable to the SD card:
sudo cp ~/workspace/test_adc/build/hw/package/package/sd_card/* mnt/ sudo umount mnt - Put the SD card into the microSD slot of the RFSoC4x2 board.
Use a USB cable to connect the Linux host to the JTAG/UART port on the RFSoC4x2 board.
Also connect the Ethernet port to a DHCP server if available.
On the host, run to connect to the UART port (install
picocomif needed):sudo picocom -b 115200 /dev/ttyUSB1Boot up the RFSoC4x2 board.
- Log in as
root(default password isroot, remember to change it after logging in). Doifconfigto check the IP address. With the IP address, can alsosshin asroot. Petalinux also creates a sudoer with loginpetalinux, whose passwd is set by the user when logging in the first time.
- Insert the SD card into a card reader on the host machine running Vitis. Check its device name:
- Configure and turn on the reference clock chips (LMK04828 and LMX2594) via SPI:
scpthis python package filexrfclk-2.0.tar.gz(I hacked out from the RFSoC-PYNQ distribution) to say/home/root/on the RFSoC board.- Install the Python package on the board:
python -m pip install /home/root/xrfclk-2.0.tar.gz scpthis python scriptset_ref_clocks.pyto say/home/root/and then run it:python /home/root/set_ref_clocks.pyto turn on the reference clocks.
- Run the
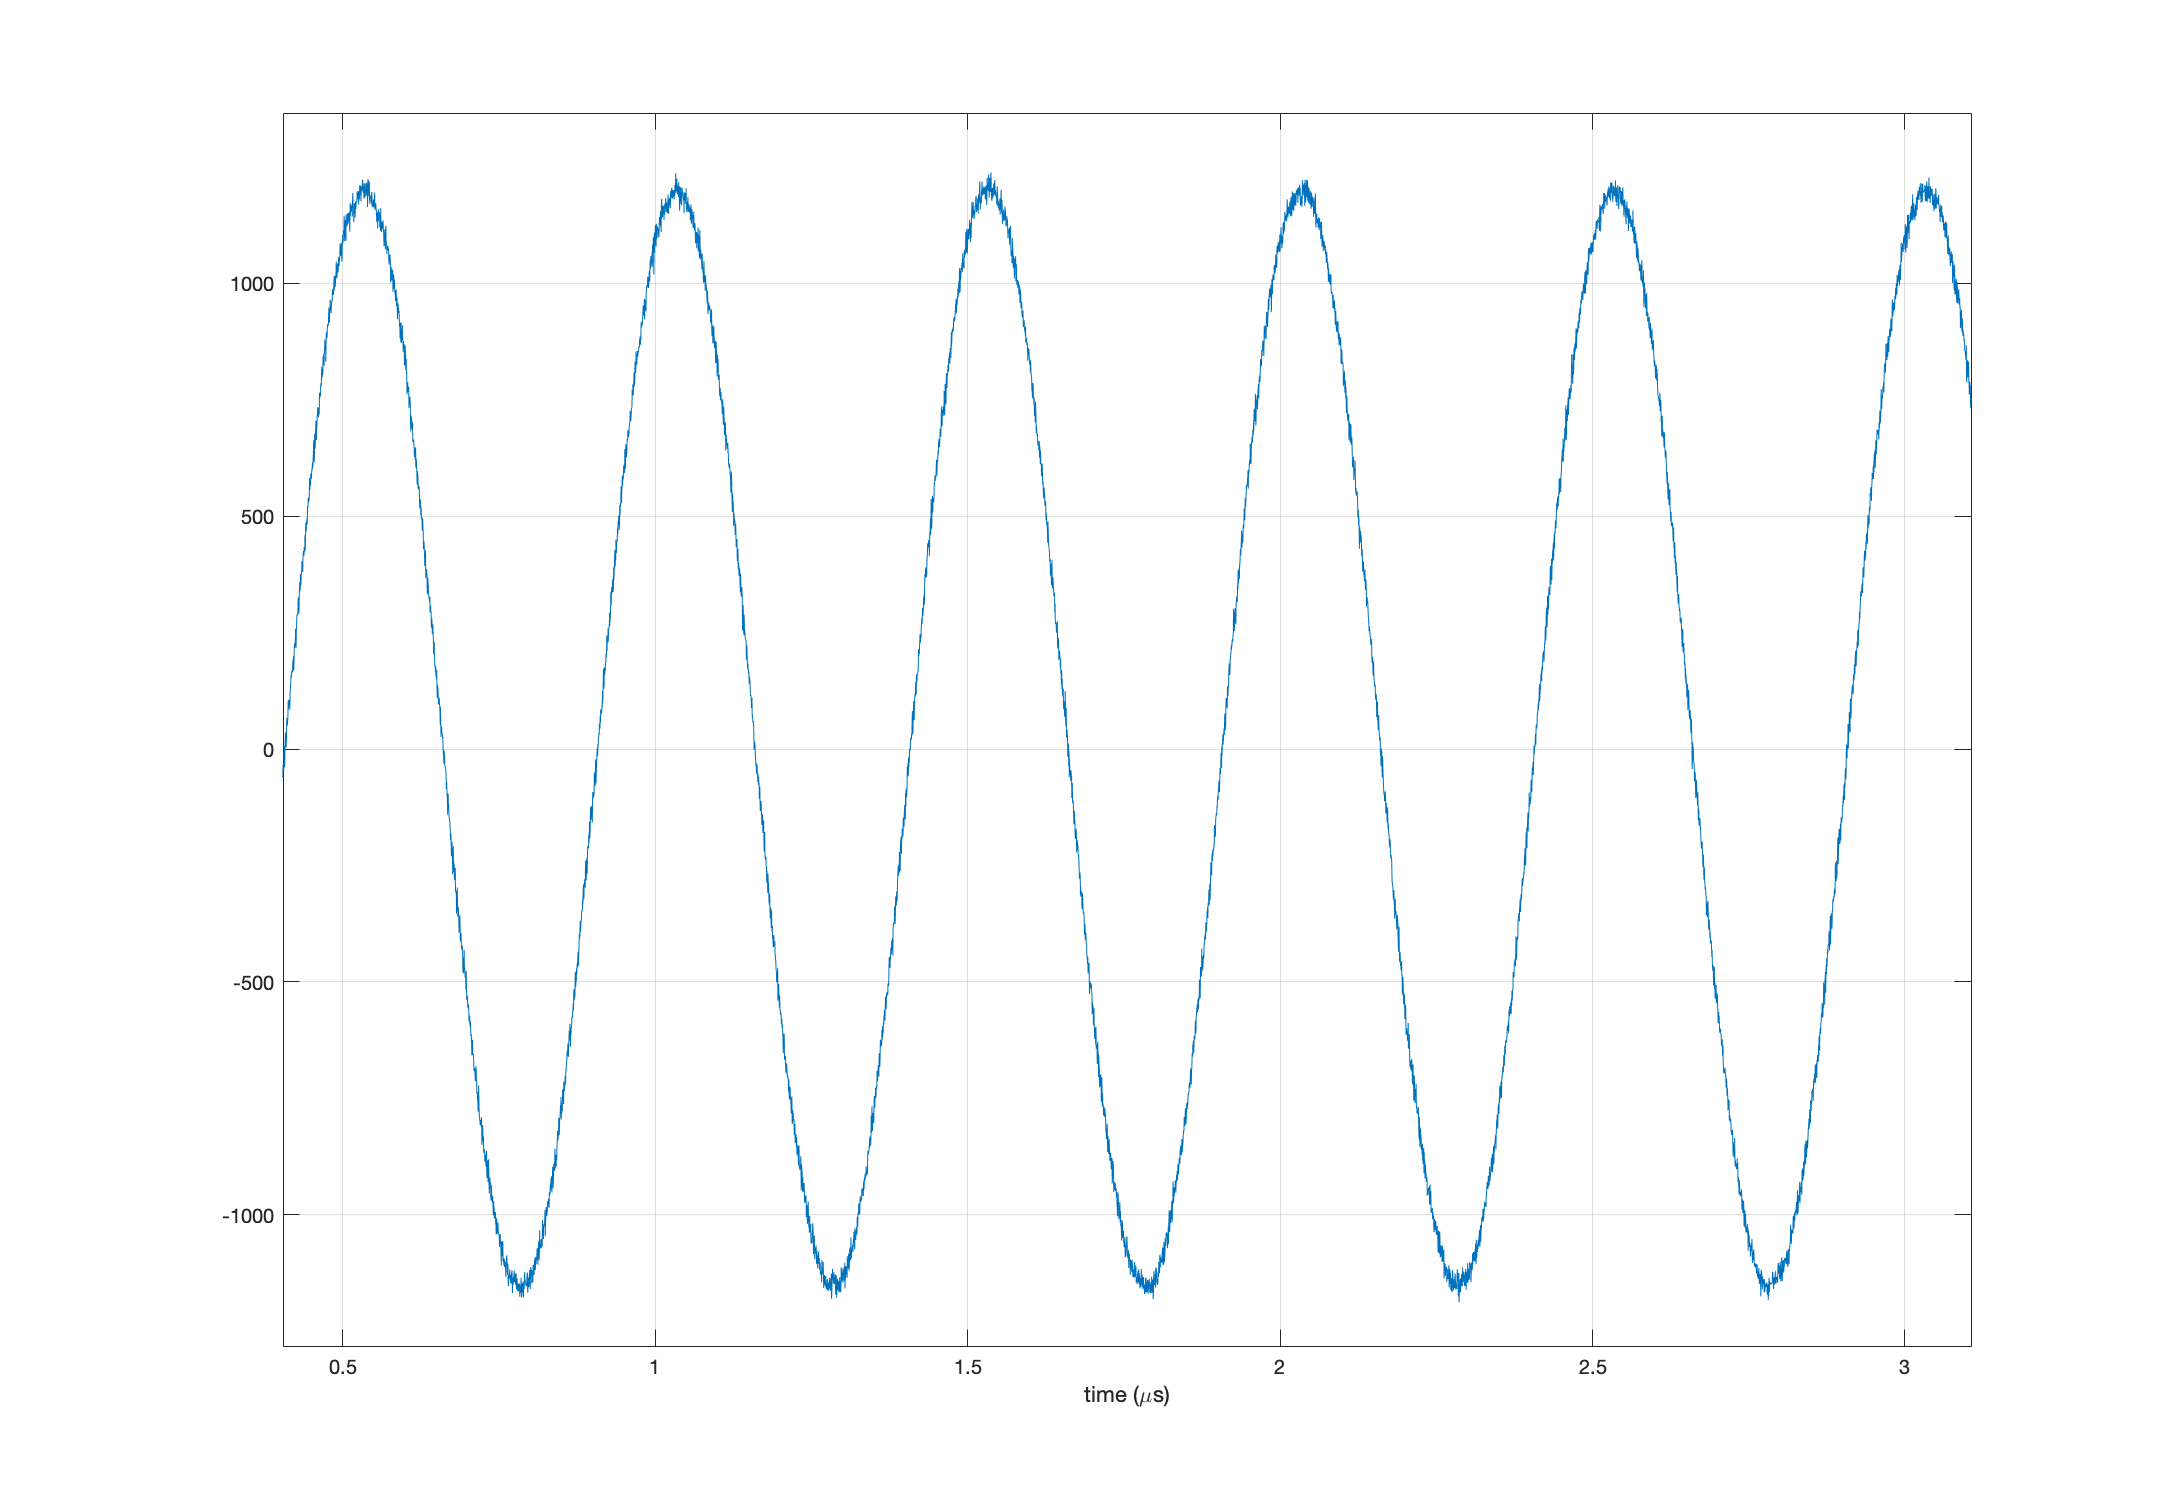
test_adcapp to grab samples from the ADC:cd /run/media/boot-mmcblk0p1/ ./test_adc_host dummy_kernel.xclbinIf the app runs properly, should see the following printout:
Found Platform
Platform Name: Xilinx
INFO: Reading dummy_kernel.xclbin
Loading: 'dummy_kernel.xclbin'
Trying to program device[0]: edge
Device[0]: program successful!
Reading data from device
Writing data to wave.txt
The samples are stored in the file
wave.txt.Here is an example plot of the captured samples when a 2 MHz sinusoid is fed to the ADC-D SMA connector:
Step 5: Run Software and Hardware Emulation
- Software Emulation:
- Need to first install Xilinx Runtime Library on the host machine running Vitis.
- Build:
- Under the FLOW view, select
test_adcin Component - Click :hammer: SOFTWARE EMULATION->Build All to build the project
- Under the FLOW view, select
- Run:
- Click SOFTWARE EMULATION->Run (Debug) to run (debug) the application
- I haven’t figured out how (there is a way in the Vitis manual but haven’t gotten to test that) to emulate streaming samples to the dummy kernel. As a result, the run will stall. Hit the Debug (a traingle with a bug) button on the left side to show the DEBUG view and you may stop the emulation there.
- Hardware Emulation:
- It appears that Vitis 2023.2.1 doesn’t support hardware emulation for the
xczu48drchip on the RFSoC4x2 board. - In fact, Vitis doesn’t seem to recognize the
xczu48drchip:- In
vitis-comp.jsoncreated for the Vitis platform, the fieldsupportedFamilyis set to the generic valuefpga, rather than the valuezynquplusRFSOCexported by Vivado. - The choice HARDWARE EMULATION->Start Emulator doesn’t show up under the FLOW view. The hardware emulation build still runs fine (need to uncheck the Do not create image box in
package.cfg), but QEMU hangs after it is started from the script file provided.
- In
- I tried to manually change all instances of
zynquplusRFSOCtozynquplusin the filexsa.jsonin the hardware archivesrfsoc_adc_hardware.xsaandrfsoc_adc_hardware_emu.xsa, and the value of the fieldsupportedFamilyinvitis-comp.jsontozynquplusin order to trick Vitis into thinkingxczu48drwas azynquplus. The choice HARDWARE EMULATION->Start Emulator showed up under the FLOW view, but QEMU still hung.
- It appears that Vitis 2023.2.1 doesn’t support hardware emulation for the